Monday, December 25, 2017

Friday, December 22, 2017

How to Keep Your Craft Station Organized

Christmas is officially THREE days away! I am surprisingly stress free because my husband and I got pretty much everything done nice and early this year (thank you Amazon Prime!). Since I'm hoping to be getting some new goodies for my craft room for Christmas I have started to attempt to clean, organize and purge in preparation. Today I'm bringing you some tips and trick for how to keep your craft station organized!


How to keep your craft station organized 

If you are a crafty person and you like everything from embroidering and sewing to DIY decorating projects done from scratch, you are probably spending quite a lot of time on your craft station. This holy place for you must be quite crowded and cluttered. If you are feeling like making some change and take things under control, there are a few things which can help you to keep your craft station well-organized.
A Beautiful Mess

Start with cleaning
The first and most important part of the organization is throwing away all the things which you don’t need. Pull everything out and take a good look around. I am sure that there are some materials which you will never use but you will need to clean and some of your supplies must be quite old and probably unusable. If you have a certain style of work and you use only certain materials, you might want to throw away all the fabrics you have kept just because. 
Get rid of all the dried-up paints and markers which may need to be cleaned later and slow you down.
The Crafted Life
Make a plan
If you like to experiment in different styles and craft, you can make a plan to separate the material depending on their purpose. Put all the papers, washi tapes, ribbons and stickers to one side of the station and store all the fabrics, pins and sewing threads to the other. This way you can always easily find the items you need, according to the project you are working on.
Best Friends For Frosting
Use everyday objects for storage
As a true crafty person, you can make a storage place out of things you can easily find around your home. Jars are very helpful to store pens, brushes, scissors. Bigger plastic boxes can store other items you need to put away. Putting stickers or labels on the boxes can make the access to your crafting instruments much easier. If you don’t mind working on another DIY project which can help you with the organization of your craft station, you can cut a PVC pipe into a few smaller couplings and glue them together. You can store your paints there and if you put them with the bottoms up, you can easily see what colour of paint you are grabbing every time.
A Beautiful Mess
Assign a place for every object
One of the best way to make sure that your craft station is always well-organized is to keep everything at a certain place. Adopt the habit of assigning a specific place for the items you use in your projects. This can assure that you will never loose your crafting instruments and you will be able to access them easily.
The Crafted Sparrow
Organize by color 
If you want to be able to find everything you need easily and make your crafting space look fun and colourful, you can organize your tools by colours. This method is both practical and fun at the same time. Forget about the struggle to find that particular ribbon or washi tape that you want to use for your new project. This colour-coordinated method can solve your problems. Even if you keep your items in drawers or boxes, you can put colourful stickers to be aware of the colours of the tools inside them.
Polished Habitat
The organizing of your craft station might take some time and effort but if you use these tricks, you can make the process much easier and enjoyable. Once your station is well-organized, you will be able to enjoy a clean and cozy place for work. If you keep the order in your crafting space, you will always be able to concentrate on your projects and forget worrying about the mess around you.


This was a guest post from Nicole. Nicole currently resides in London with her family. She is a co-owner of a small cleaning company and enjoys reading and writing.

For more craft room/office inspiration be sure to check out my pinterest board!

Tuesday, December 12, 2017

DIY Hanukkah Menorah

Happy first day of Hanukkah!!
As I'm sure you know by now, I'm adopted. So last year for Christmas my mom got a 23andMe DNA kit for both my husband and myself. I eagerly awaited the results and when I finally received them, some of the results were as I had suspected (like the British & Irish... thank God, because I have a shamrock tatoo! Haha.), but some were definitely a surprise.  
Learn your ancestry with 23 and me!
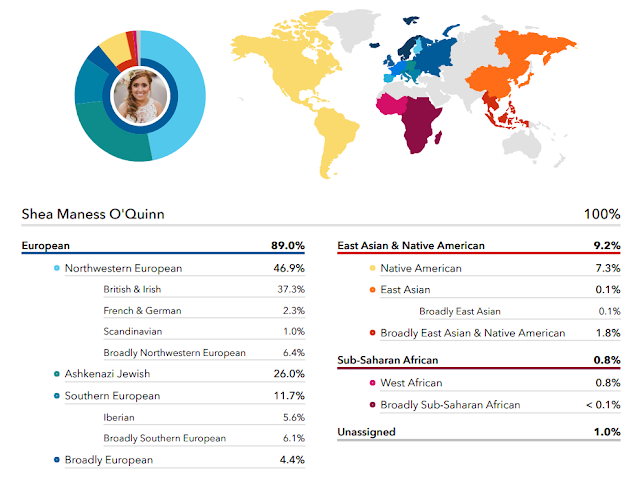
I would have never guessed I'd have so much Ashkenazi Jewish or Native American in me. In fact, in my self reported information I actually said I definitely WASN'T Jewish... apparently I was wrong! While these results are obviously guesstimations essentially it really got me thinking. My results stated "You most likely had a parent, grandparent, or great-grandparent who was 100% Ashkenazi Jewish. This person was likely born between 1900 and 1960." Having learned this, I started reading up on Judaism. While I know that having Ashkenazi Jewish heritage and Judaism as a religion are different things, I decided I wanted to attempt to incorporate some Hanukkah traditions this year. First up, I wanted to DIY a Menorah!
Create your own DIY Menorah!
Lucky for me, my husband is a lumber salesman, so we have plenty of scrap wood laying around. I was able to create this project using all items I already had! I really liked this menorah that I found (a Martha Stewart project of course) so I used it as my inspiration. 

Supplies

Wood (We used a scrap piece of 1x2 pine and a scrap piece of 2x2 pine)
Drill

I started the project by hunting down some Hanukkah candles. I started at my local party store. They had a Hanukkah endcap with cheesy plates and napkins and decor, but no candles. I started thinking finding some may not be an easy task. But, I made a stop to my local Home Goods and not only did I find Hanukkah candles, I found these cute ones! 

Once I had the candles we were able to figure out what size drill we needed to create the holes for them. I left this part to my husband (mostly because he's better at math and I wanted all of the holes to be just right). Once the holes were drilled we glued the center piece (for the shamash) and let it dry. 

Then it was time for the fun part, designing my sentiment. Using Cricut Design Space and one of my favorite fonts, I created this. 
Create your own DIY Menorah!
One of my design secrets is, that I usually add the item that I'll be decorating so I can really visualize the final product. In this case it was a piece of wood that was 1.5" x 14", so that's what the cream rectangle represents. 
Once I was happy with my design, I cut it and weeded it using my BrightPad. This was my first time attempting to use iron on with wood so I was a little nervous but, with the help of my EasyPress, it worked like a charm! I'd say it worked even better than on actual fabric! When it was done the carrier sheet even slid off like how it does when you put on a temporary tattoo! Haha. Weird comparison? Maybe. But you know what i mean. 
I ended up adding some gold glitter to the shamash piece as well (and I just cut that with my paper trimmer since it was an easy rectangle). And viola! I have my very own DIY'd Menorah for my very first Hanukkah! I'm so excited to burn it tonight!

Wednesday, November 29, 2017

Holiday Gift Guide // Stocking Stuffers

Christmas is officially less than a month away and I'm already thinking about stocking stuffers! It's no secret, my absolute favorite part of Christmas growing up, hands down, was stockings. My grandma was the queen of finding all the fun little nick knacks and gadgets that you didn't even know you needed. I've tried to continue this tradition, first with my friends and roommates and now with my husband (and he's gotten much better at it! haha). 

Here are some items I'd love to find in my stocking...
Check out these Etsy finds for your stocking!

Sleep Mask- I'm a sleep mask lover, I can't get enough, and mimosas really are the only reason to wake up. // Keychain- How stinkin' cute are these? I love all the fun colors!
Hair Ties- I can never have too many Flhair accessories!  // Candle- A Friends candle? Yes please! // Sideways Initial Necklace - I love how simple and delicate this necklace is. // Treat Yo Self Mug- Tom Haverford is my spirit animal. // Bath Bomb- Who doesn't love a yummy bath bomb?
Bead Bracelets- These are the perfect accessories for any occasion!

What are you hoping to find in your stocking?? 
If you're looking to make some stockings of your own, be sure to check out how I made my own!

Monday, November 27, 2017

DIY Buddy the Elf Ornament // Cricut Ornament Exchange 2017

Several weeks ago, a fellow blogger Albion Gould asked who would be interested in doing a Cricut ornament exchange and I of course jumped at the chance (any excuse to use my Cricut). I ended up getting Jordan from Jordan's Easy Entertaining and after finding out she loved the move Elf, I decided I HAD to create something Elf related! Using basic shapes and images in Design Space I was able to create something really fun! 
Create your own "Buddy the Elf" Ornament!

Supplies:

Cricut Explore Air 2 (or any of the Explore family)
Cricut Cutting Mat (lately the LightGrip has been my favorite)
Light Peach Cardstock for the face
Green Cardstock for the hat
Yellow Cardstock for the hat detail
White Cardstock for the back
Brown/Orange Cardstock for the hair
Eyelet (I used white)
Eyelet Setter (this one is my absolute FAV)
Glue Pen (also my FAV)

(I should be embarrassed to admit these were all supplies I already had in my arsenal... but I'm not haha.)
Create your own "Buddy the Elf" Ornament!
Assembly is easy, using the back piece as your guide, glue down all the pieces, starting with the hat, then face, then the hair and lastly the hat detail. Let it sit for a minute to dry white you prep the vinyl by putting it on the transfer tape. Center the vinyl and lay it down where you want it. I was a little afraid that the transfer tape might rip the paper but I had no issues. To be safe tho, don't press it down too firmly. Then you simply set the eyelet and tie your twine and you're done!
Create your own "Buddy the Elf" Ornament!
If you want to make your own Buddy the Elf ornament you can make one yourself here

Jordan made me this adorable "Santa Baby" ornament for the exchange. Isn't it cute??
Create the "Santa Baby" Ornament with Cricut!
I had so much fun with this! Thank you Albion for letting me be a part of it!

Be sure to check out the other ladies who participated!

Friday, November 24, 2017

Easy DIY Dollar Tree Ornament Place Cards

Have you had enough of my Girly Stocking Making Brunch yet? I sure hope not because I have one last DIY for you! Although I love my Cricut and use it every chance I get, I realize that not everyone has one (although everyone should). So I decided to do a project that didn't require the use of my machine and I came up with something I kind of love! 
Check out these easy DIY Dollar Tree Ornament Place Cards!
Whether you create this simply to hang on your tree, or, like me, also use them as a favor/place card this DIY is simple enough for even a beginner! And the best part? Almost EVERYTHING was bought from the Dollar Tree!
Check out these easy DIY Dollar Tree Ornament Place Cards!

Check out these easy DIY Dollar Tree Ornament Place Cards!

Check out these easy DIY Dollar Tree Ornament Place Cards!

Supplies Needed

Ornaments (they were two for a dollar!)
Gold Bells (I bought a bag for a dollar)
Dymo Labels (The neon pink are hard to come by, but I was able to find them in a three pack with neon green and orange which I'm sure I'll be able to find a use for)
Gold Spray Paint (Optional, but we all know, I have to make all the things gold)

Assembling the ornaments is easy! Simply remove the top (this is also when I spray painted them gold) and fill with what you'd like! The gold bells and hot pink pom poms were perfect for my party. Once the spray paint was dry, I put the tops back on, used the label maker to make everyone's names and voila! Done! 
Check out these easy DIY Dollar Tree Ornament Place Cards!
Such a fun and easy way to create something custom for your guests!

And if you missed them, be sure to check out all the other posts from this party!

Wednesday, November 22, 2017

Stocking Making Party with Cricut EasyPress AND a Maker Giveaway!

Create your own CUSTOM stockings with Cricut EasyPress!
As I'm sure you've seen, all this week I'm sharing fun DIY projects for a Girly Stocking Making Brunch. I started by showing you how to make the stockings using the Cricut Maker and this easy Design Space Project. 
Create your own CUSTOM stockings with Cricut!
Today, I'm showing you how to customize them with Cricut's new EasyPress!

To save a little time (and headache) I went ahead and premade all of the stockings myself, which, with the new Cricut Maker, was a BREEZE! 
(No joke, I made 6 in an evening and DIDN'T want to rip my hair out!)
Create your own CUSTOM stockings with Cricut EasyPress!
Using my Cricut Explore Air 2 I was able to cut everyone's names out of fun corresponding iron on vinyl! Cricut has so many iron on options, its hard to decide! So I couldn't! I cut everyone's names out of both Iron-on Lite in White and Foil Iron-on in Light Gold. (I also cut them out of both a a script font (Chalkboard, available in Cricut Access) and a serif font (Straight & Simple, also available in Cricut Access). 
I, of course, made a couple of cute vinyl signs while I was at it!
Create your own CUSTOM stockings with Cricut EasyPress!
All the girls had SO much fun customizing their stockings! 
Create your own CUSTOM stockings with Cricut EasyPress!
The REAL fun though was showing them all the new EasyPress! None of them had even seen the new EasyPress, let alone had a chance to play with it, so it was so exciting! I explained to them all how it takes all of the guesswork out of iron on vinyl! Depending on your fabric and iron on vinyl type, you choose your settings and time and just like that, you're done! Pretty sure I saw them all add it to their Christmas lists. :)
Create your own CUSTOM stockings with Cricut EasyPress!
My favorite part is always the reveal!
Create your own CUSTOM stockings with Cricut EasyPress!
And just like that... totally custom stockings! You can, of course, do this to store bought stockings as well but why, when you can make your own!Create your own CUSTOM stockings with Cricut EasyPress!
Create your own CUSTOM stockings with Cricut EasyPress!
Also... I've got some exciting news! If all my talk about the new Cricut Maker has you wanting one of your own... here's your chance to WIN one! Enter below for a chance to win!
a Rafflecopter giveaway

And if you missed them, be sure to check out all the other posts from this party!
Girly Stocking Making Brunch
Easy DIY Stockings with the NEW Cricut Maker!
Easy DIY Dollar Tree Ornament Place Cards
This is a sponsored conversation written by me on behalf of Cricut. The opinions and text are all mine.

Tuesday, November 21, 2017

Easy DIY Stockings with the NEW Cricut Maker!

By now I'm sure you've seen the new Cricut Maker machine in all it's glory. I've been singing the praises of Cricut since my very first Explore machine but the new Maker just takes crafting to a whole new level. As you may have seen yesterday, this past weekend, I hosted a fun Girly Stocking Making Brunch, the secret weapon behind the stocking making... the Cricut Maker of course! 
Easy DIY Stockings with the NEW Cricut Maker!
 Using a very simple (and FREE!) Design Space project, I was able to whip these babies up in no time!
Easy DIY Stockings with the NEW Cricut Maker!
A simple Design Space search for "Stocking" brings up this project.
Easy DIY Stockings with the NEW Cricut Maker!
All you have to do is follow the instructions they provide and you'll have a custom stocking in no time! I did end up customizing the pattern a bit to make it more to my liking and I'll show you how I did that.

Supplies Needed

1/2 yard of fabric for outside
1/2 yard of fabric for lining
Corresponding thread
8 inches of ribbon for hanging loop
Scissors or rotary blade
Iron
Easy DIY Stockings with the NEW Cricut Maker!
My fabric loaded onto my pink 12 x 24 fabric mat. 
Since I decided not to do the heel and toe detail (because, let's be honest, I didn't want to spend the extra time) I just went ahead and cut mats 1 and 2 twice (once for the outside of the stocking and once for the lining of the stocking... as you can see below) and skipped mats 3-5.
Easy DIY Stockings with the NEW Cricut Maker!
So I ended up with four cuts... two of the lining and two of the outside. 
Easy DIY Stockings with the NEW Cricut Maker!
 Another element of the stocking that I didn't personally like is that there was no hanging loop... so I added one! I simply took a piece of ribbon (about 8 inches long) folded it in half, and pinned it at about a 45 degree angle facing down four inches down on the back side of the lining and then sandwiched it between both lining pieces (right sides together).
Easy DIY Stockings with the NEW Cricut Maker!
(In the picture it's shown on top just to show you placement.) 
 Then, just follow the rest of the directions given in Design Space and you'll have an adorable (and SUPER easy) new stocking!

Once the stockings were made, the real fun began... the customization! 
Easy DIY Stockings with the NEW Cricut Maker!
Be sure to check back tomorrow to see how you can use the new EasyPress to customize your new stocking!

And if you missed them, be sure to check out all the other posts from this party!
This is a sponsored conversation written by me on behalf of Cricut. The opinions and text are all mine.

Related Posts Plugin for WordPress, Blogger...