
By now I'm sure you've seen the new Cricut Maker machine in all it's glory. I've been singing the praises of Cricut since my very first Explore machine but the new Maker just takes crafting to a whole new level. As you may have seen yesterday, this past weekend, I hosted a fun Girly Stocking Making Brunch, the secret weapon behind the stocking making... the Cricut Maker of course!

Using a very simple (and FREE!) Design Space project, I was able to whip these babies up in no time!
 A simple Design Space search for "Stocking" brings up this project.


All you have to do is follow the instructions they provide and you'll have a custom stocking in no time! I did end up customizing the pattern a bit to make it more to my liking and I'll show you how I did that.
Supplies Needed
1/2 yard of fabric for outside
1/2 yard of fabric for lining
Corresponding thread
8 inches of ribbon for hanging loop
Scissors or rotary blade
Iron

My fabric loaded onto my pink 12 x 24 fabric mat.
Since I decided not to do the heel and toe detail (because, let's be honest, I didn't want to spend the extra time) I just went ahead and cut mats 1 and 2 twice (once for the outside of the stocking and once for the lining of the stocking... as you can see below) and skipped mats 3-5.
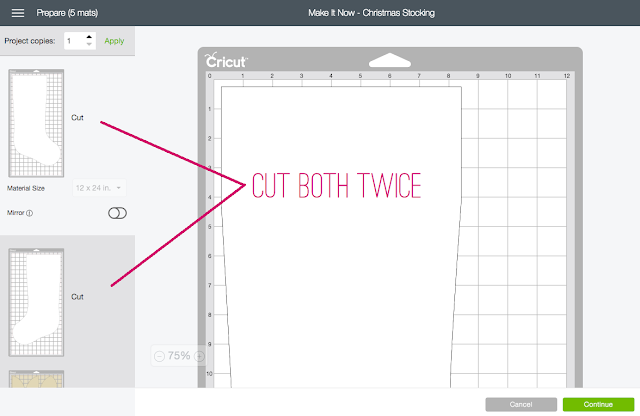 So I ended up with four cuts... two of the lining and two of the outside.


Another element of the stocking that I didn't personally like is that there was no hanging loop... so I added one! I simply took a piece of ribbon (about 8 inches long) folded it in half, and pinned it at about a 45 degree angle facing down four inches down on the back side of the lining and then sandwiched it between both lining pieces (right sides together).

(In the picture it's shown on top just to show you placement.)
Then, just follow the rest of the directions given in Design Space and you'll have an adorable (and SUPER easy) new stocking!
Once the stockings were made, the real fun began... the customization!


Be sure to check back tomorrow to see how you can use the new EasyPress to customize your new stocking!
And if you missed them, be sure to check out all the other posts from this party!


This is a sponsored conversation written by me on behalf of Cricut. The opinions and text are all mine.
2 comments:
First of all i love the title of this article, i am in full agreement as the design is creative and unique. Thanks for sharing this as it is nice of you.
Thanks for your information, it was really very helpfull.. Thigh high stockings
Post a Comment