Showing posts with label Mother's Day. Show all posts

Thursday, April 2, 2020

Ten Little Ways to Make Your Gifts Special with Cricut Joy

This is a sponsored post written by me on behalf of Cricut. All opinions are 100% mine.

I'm sure by now you've all heard about Cricut's latest machine, the Cricut Joy. And if you haven't, allow me to introduce you.

Check out these ten little ways to make your gifts special with Cricut Joy!

Isn't she adorable? (Yes, I refer to her as a she, because with a name like "Joy" it just made sense.)


This awesome little machine makes it so easy to quickly and easily personalize anything with one cut and one color in 15 minutes or less! It's fun, functional and best of all, it's easy to use... especially if you are already familiar with Cricut Design Space. It's the perfect companion to the machines you already know and love!


We all know I love my Cricut but, sometimes it can be a bit cumbersome. Once I park my machine in my craft room that's pretty much where it lives. The new Cricut Joy though is the perfect size! It's literally like 1/4 of the size of the Maker so if you wanted to whip it out for a quick project, you totally can. You can leave it on your counter or on a shelf. It packs away easily and sets up instantly so you can take it just about anywhere. (And if you DO use the Cricut Joy to make on the go, check out this adorable tote they made to carry it in style.)


The thing that got me the most excited about the new Joy was the ability to cut MAT FREE! That's right! Cricut pulled out all the stops and made it even easier to create on the fly! Cricut Joy has a full suite of brand new materials that do not require a mat which means less steps and a faster finished product, who doesn't love that?! The new Smart Vinyl can cut up to 20 feet... yes you read that right... TWENTY FEET of a repeated cut. So don't let its size fool you, it can still handle BIG projects!


Another awesome feature is it's ability to make cards. Yes, all the previous machines were able to make cards but not like this... this machine has a designated card mat and insert cards that make it easier than ever to whip up a card in minutes.


But wait, there's more (in my best infomercial voice)... the Cricut Joy writes too! One thing to note, unfortunately the machine does take different pens than previous machines. Because the Cricut Joy is a reimagined version of the machines we already know and love, a lot of things had to get smaller and as such, the carriage mechanism is made to fit a different blade as well as different pens. A small price to pay for its compact size.


Now that I've caught you up on what the Cricut Joy is and some of its amazing features... lets get into a project shall we?


It's no secret that receiving gifts is one of my love languages and as such, giving gifts is a way that I like to show love. For me, it's not just in the gift itself but in the way its presented as well, meaning I like to spend extra time on the wrapping as well to show a little extra love. Today I wanted to show you ten different ways you can embellish your gifts to make them just a little more special with the new Cricut Joy.

Check out these ten little ways to make your gifts special with Cricut Joy!

I was super excited to try the new Smart Label material so that is what I'll be showing you today. For this project you'll need:


Check out these ten little ways to make your gifts special with Cricut Joy!

I began by designing the file. Since Mother's Day and Father's Day are right around the corner, I decided to make both a "To:Mom" and "To:Dad" label. (Note, I changed the color of the tags just to make it easier to see against the white canvas. I cut them on white smart label vinyl though.)

Check out these ten little ways to make your gifts special with Cricut Joy!


(You can find the Design Space file HERE).


Once done designing the file, I clicked "Make It" in the upper right hand corner. With the new Cricut Joy there are a few differences when making a project... the first being this screen.

Check out these ten little ways to make your gifts special with Cricut Joy!

Depending on your project and your material(s), you may or may not be using a mat. For this project we won't be using a mat (so exciting!)

Check out these ten little ways to make your gifts special with Cricut Joy!

As you can see, the mat preview screen looks a little different from what you may be used to. Double check that everything looks good and that you're happy with what you previously selected as far as cutting with or without a mat. As you can see you can change this in the drop down menu on the left if you need to. If you are cutting iron on vinyl, this is when you can also mirror your image.

Check out these ten little ways to make your gifts special with Cricut Joy!

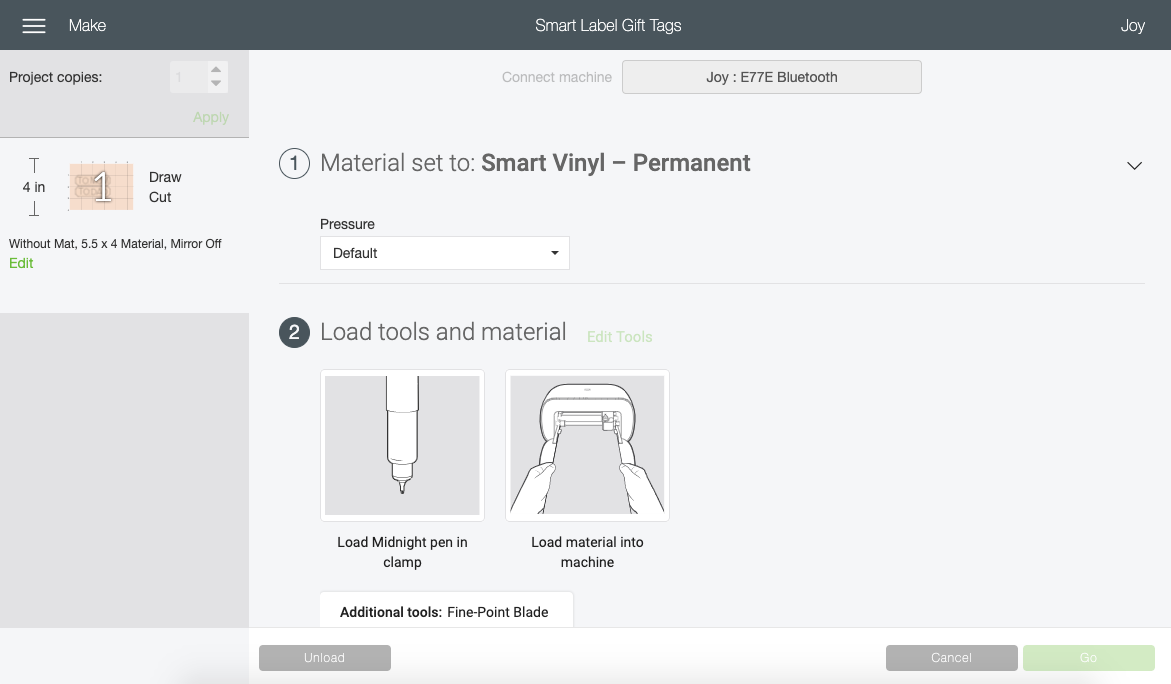
Because we selected that we would be cutting matless, Design Space intuitively knows what material options we have available and only shows us those ones. I chose the appropriate "Smart Label Writable Vinyl".
Check out these ten little ways to make your gifts special with Cricut Joy!

Load your pen and your vinyl and you're ready to rock!

Check out these ten little ways to make your gifts special with Cricut Joy!


Check out these ten little ways to make your gifts special with Cricut Joy!


Check out these ten little ways to make your gifts special with Cricut Joy!

Another thing you may have noticed is that there are no buttons on the Cricut Joy! So you'll be clicking "go" from your device instead of your machine for all Cricut Joy projects.

Check out these ten little ways to make your gifts special with Cricut Joy!


Check out these ten little ways to make your gifts special with Cricut Joy!

Once the Joy is done writing, it will prompt you to insert the fine point blade. Once it's done cutting, you're all done!

Check out these ten little ways to make your gifts special with Cricut Joy!


Check out these ten little ways to make your gifts special with Cricut Joy!

Click unload from your device and your labels are ready to be used! I was really anxious to run my fingers across it because I was SURE it would smear, but it didn't!

Check out these ten little ways to make your gifts special with Cricut Joy!


Check out these ten little ways to make your gifts special with Cricut Joy!

I couldn't help myself and I went ahead and created 9 other ways to customize your gifts with Cricut Joy! Check them all out!

Check out these ten little ways to make your gifts special with Cricut Joy!

There are seriously SO many ways to give your gifts that little extra something special! Here are all the ways that I did:
-Reverse cut banner tag
-Hanging bottle tag
-Vinyl
-Iron on vinyl on ribbon
-Name out of Adhesive Backed Deluxe Paper
-Hanging Name Tag
-Iron on vinyl embroidery hoop tag
-Adhesive Backed Deluxe Paper Belly Band
-Name cut out of Paper
-Smart Label Permanent Writable Vinyl Tag

Check out these ten little ways to make your gifts special with Cricut Joy!


Check out these ten little ways to make your gifts special with Cricut Joy!


Check out these ten little ways to make your gifts special with Cricut Joy!


Check out these ten little ways to make your gifts special with Cricut Joy!


Check out these ten little ways to make your gifts special with Cricut Joy!


Check out these ten little ways to make your gifts special with Cricut Joy!


Check out these ten little ways to make your gifts special with Cricut Joy!


Check out these ten little ways to make your gifts special with Cricut Joy!


Check out these ten little ways to make your gifts special with Cricut Joy!


Check out these ten little ways to make your gifts special with Cricut Joy!

Doesn't this little machine pack a BIG punch? I was able to create SO many awesome projects with the new Cricut Joy! I can't wait to keep playing with it and see what else I am able to create! Right now is a strange time with COVID-19 but I am so looking forward to packing up my little Cricut Joy to craft with friends like never before! If you're asking yourself "Why do I need a Cricut Joy, even if I already have a Cricut machine?" the answer is simple, it's going to take your crafting to the next level! You are going to be able to craft quicker and in more places than ever before!


Be sure to check out Cricut.com to learn more and if you want to add one to your craft arsenal, they are sold pretty much everywhere you can buy craft supplies (even Target and Walmart!)!


For the Design Space file for ALL of the tags I made, click HERE.

Wednesday, October 11, 2017

Mother's Day Floral Arranging Workshop Recap

Several months ago, I hosted a Mother's Day Floral Arranging workshop with my friend and florist extraordinaire LeeLina Martin. In case you missed her Meet the Maker feature, I first met LeeLina when I was looking for a florist for my wedding. I don't know how common it is to stay in touch with your vendors after your wedding but we are well over two and a half years out at this point and I feel lucky I've gotten the opportunity to call her a friend. 

For months (if not years) I've been yearning to host crafting workshops. I have found little ways here and there, whether it's getting my girlfriends together to show them how to make Christmas stockings, or using my birthday as an excuse to make dream catchers. It has recently gained some popularity but most of the workshops I've seen are well out of my price range. I wanted to create something that was not only educational, but also affordable. When I racked my brain for what would be the perfect first workshop, LeeLina of course came to mind. I pitched the idea to her, and she loved it! We decided that with Mother's Day around the corner, that would be a great time to do it. So, with my idea in motion, it was time to find a venue. There is this local adorable party supply store called Wild Child Party & Supply. They have a great little space adjacent to their shop for events. I went out on a limb and called to see if it happened to be available the day before Mother's Day, and it was! We had a venue! Now all we needed was to fill the seats!
Check out this fun Mother's Day Floral Arranging Workshop!
To our surprise (and excitement!) the event sold out! We were thrilled! We each did what we do best to prepare for the workshop. LeeLina got all the florals picked out, and I handled all the little details, like a custom sign for the event!
Check out this fun Mother's Day Floral Arranging Workshop!
And the mimosa bar (with custom straws for each person). 
Check out this fun Mother's Day Floral Arranging Workshop!
The florals that LeeLina brought were just to DIE for. The colors, the textures, everything was flawless!
Check out this fun Mother's Day Floral Arranging Workshop!
Each guest even received their own set of clippers!
Check out this fun Mother's Day Floral Arranging Workshop!
Everyone had so much fun with it!
Check out this fun Mother's Day Floral Arranging Workshop!

Check out this fun Mother's Day Floral Arranging Workshop!

Check out this fun Mother's Day Floral Arranging Workshop!
 Even though everyone used the same flowers, everyone's arrangements ended up so unique!
Check out this fun Mother's Day Floral Arranging Workshop!

Check out this fun Mother's Day Floral Arranging Workshop!

Check out this fun Mother's Day Floral Arranging Workshop!
I couldn't have asked for a better group of girls to be at my first workshop. 
Check out this fun Mother's Day Floral Arranging Workshop!

Check out this fun Mother's Day Floral Arranging Workshop!
 And most importantly, I couldn't have asked for a better instructor! I could seriously sit and brag about LeeLina all day, but don't worry, I won't. Not only is she a dream to work with, she is absolutely beautiful both inside and out. I can't wait to host another workshop with her!
Check out this fun Mother's Day Floral Arranging Workshop!
If you'd like to be added to the mailing list for future workshops, e-mail me at 
notsoclishea(at)gmail(dot)com 

Friday, May 5, 2017

"Treat Yo" Mother with Cricut!

I had so much fun with the Bestie Basket that I decided I wanted to do something similar for Mother's Day!
"Treat Yo" Mama this Mother's Day with Cricut!

In true Tom Haverford and Donna Meagle fashion, I decided to create some Mother's Day "Treat Yo Self" goodness.  

I started like I do most projects, by heading to my local Target and finding all sorts of goodies I thought my mom might like. Because I am a little bit particular (ok, a LOT particular) I tried to stick to a peach color scheme and here is what I came up with...
"Treat Yo" Mama this Mother's Day with Cricut!
Pacifica Cactus Water Makeup Removing Wipes // 2 SheaMoisture Coconut & Hibiscus Hand and Body Scrub // 3 ME! Bath® Love Me! Mini Ice Cream Bath Soak // 4 Bath Sponge // 5 Charles & Charles Rose // 6 Kristin Ess Strand Strengthening Reconstructive Moisture Mask // 7 Que Bella® Face Mask // 8 Thimblepress Mom Fuel Coffee Mug

I stopped at my local Hobby Lobby to get a basket and I found the CUTEST gold basket AND it was on sale! I can't find it on their website but you can find a similar one here.

Now, you could stop here and I'm sure your mom would be perfectly content, but WHY when you can customize it using your Cricut Explore Air 2?!
"Treat Yo" Mama this Mother's Day with Cricut!
Using Cricut's Design Space, I was able to create these adorable "Treat Yo Self" inspired labels for all of my goodies (in my go-to peach and mint color scheme of course)!
"Treat Yo" Mama this Mother's Day with Cricut!
Using sticker paper I printed all of the labels (except the one I wanted to use on the basket itself, that one I just used regular cardstock). Then I applied them! Everything turned out so cute!
"Treat Yo" Mama this Mother's Day with Cricut!

"Treat Yo" Mama this Mother's Day with Cricut!
It turned out so cute and I can't wait to give it to my momma!

 To print my custom stickers yourself, go here

Or, if you'd like, they have another adorable version on Design space here

"Treat Yo" Mama this Mother's Day with Cricut!

Disclosure: This post contains affiliate links, meaning that I receive a small commission for items purchased through my blog, at no cost to you. All items advertised are items that I actually use and all opinions are 100% my own.

This is a sponsored conversation written by me on behalf of Cricut. The opinions and text are all mine.

Related Posts Plugin for WordPress, Blogger...