
You guys! We are officially less than a hundred days out from Christmas! I've never really been the type to get super excited about Christmas because with it, also comes tons of added stress but this year... I get to celebrate the first Christmas with my little! The thought of being able to experience Christmas again through the eyes of a child literally has me giddy. So, that being said, it's not too early for a Christmas craft right? Truth be told, this DIY could really be used for any occasion, traditionally the advent calendar is used for Christmas but you can countdown to anything really... a birthday, a wedding, a graduation, the list goes on! But let's get to it shall we?

If you're unfamiliar with the new tools, allow me to fill you in:
We've got the Basic Perforation Blade - With this blade you can create finely perforated lines for any design. You know those little lines that help you tear a ticket perfectly? Now you can create them yourself with this awesome new blade! (Spoiler alert, I used this bad boy for todays project and I LOVE it.) The tip simply snaps onto the QuickSwap Housing and your Cricut Maker does the rest! It's perfect for tear-out booklet pages, raffle tickets, homemade journals, or for any project that calls for a neat tear.
Then there's the Wavy Blade - A wavy finish was always doable with the standard fine tip blade but it would take much longer. Now with the new wavy blade you are able to get a decorative edge in half the time! This blade is perfect for vinyl decals, iron-on designs, envelopes, cards, gift tags, collage projects, or any time you need fabulously finished edges and stylish design accents. Perfect for iron-on, vinyl, paper, cardstock, fabric, and more! (I also used this blade for todays project!)
There's also the Fine Debossing Tip - There is something super elegant and polished about debossing. It definitely has a professional look that screams custom. Unlike the folders that most crafters are used to for debossing, this rolling debossing ball, with a wider range of motion, gives you free reign to customize, personalize, and design with incredible intricacy. It's the perfect tool for the ultimate personalized touches. It helps create a stunning effect on foil cardstock, coated paper, shimmer and glitter paper, basswood, and much more.
And lastly the Engraving Tip – This is one I really can't wait to try and is something I'll be honest, I was a little disappointed I couldn't do with my first Explore machine (there are some tutorials online but they seemed a bit dodgy to me). With this tip you are able to write personalized text or create monograms, draw decorative flourishes and embellishments, or inscribe your favorite quotes on a keepsake! I can't wait to engrave the new Cricut Metal Sheets! Speaking of Christmas... I've already got some gift ideas brewing using the engraving tip!
So now that I've filled you in on the new tools, let's get into the DIY!
 If you're new around here, I have two favorite Christmas past times, stockings and advent calendars. After the Cricut Maker was able to help me create my own stockings, I really wanted to try my hand at making my own advent calendar with some of the new tools and I love the way it turned out!


So now that I've filled you in on the new tools, let's get into the DIY!

Supplies:
- My Design Space File
- Cricut Maker
- Cricut StandardGrip Cutting Mat
- Cricut Quick Swap Housing
- Cricut Single Scoring Wheel (or Scoring Stylus)
- Cricut Basic Perforation Blade
- Cricut Wavy Blade
- Cricut XL Scraper (optional)
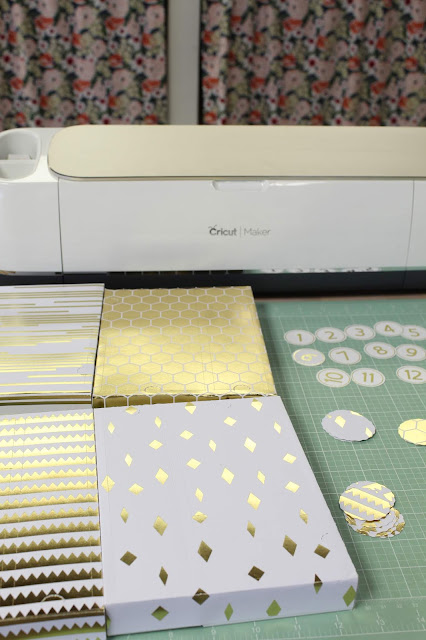
- Paper for Advent Calendar (I used some of Cricut's Deluxe Foil Embossed Paper)
- Dollar Tree Gift Boxes (They come three for a dollar!)
- Glue Gun & Sticks
- Tape Runner
- White Cardstock (to print the numbers)
- LaserJet Printer (optional)
- Heidi Swapp Minc and Foil (optional)
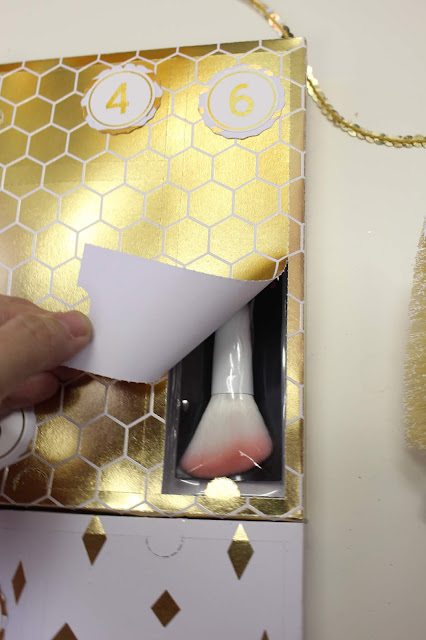
- Gifts! This part is totally up to you and your recipient! Your local dollar store or the famous target dollar spot is a great place to find stuff to load up your advent calendar, just be mindful to choose items that will fit into one of the three box shapes. Take them with you shopping if you need to.

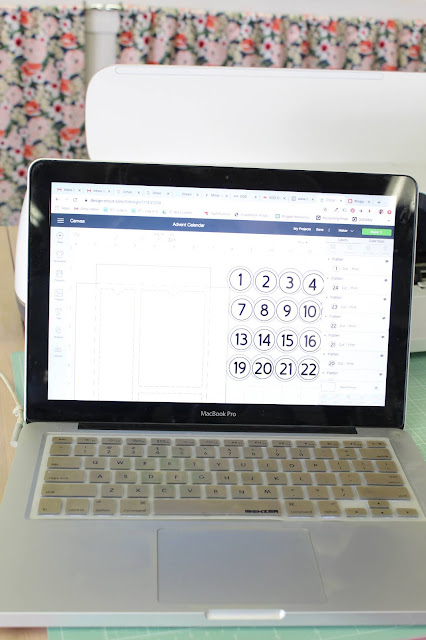
Open the project in Cricut Design Space. I've already done all of the work for you! All you have to do is click Make It! Some things to note: I have created the file so that you can make up to 8 segments (24 boxes, like a traditional advent calendar). I decided I preferred the look of 12 thought, more like the 12 days of Christmas, totally up to you though. s

Hit make it and watch the Cricut do it's magic! The first thing it will prompt you to do is print the first page (I prefer to do this on cardstock for a more polished look, it also will cut better for you than standard copy paper.) Once printed, place your paper on your cutting mat and watch your Cricut do its magic, reading the sensor lines and cutting your printed items perfectly!

Remove the printed numbers from the mat.

(If you're extra like me, I printed my numbers on my laserjet printer so that I could foil them using my Heidi Swapp Minc machine. This is totally optional, but I am afflicted with the Midus Touch and prefer for everything I touch to be gold.)
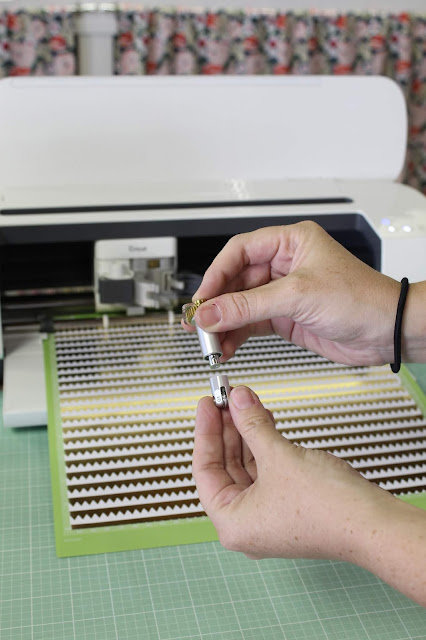
After the numbers have been cut using the fine tip blade, you will then be prompted to use the single scoring wheel (If you don't have it, you can also use the scoring stylus for this). The Quick Swap Housing makes swapping the blades a breeze, simply push the plunger on the top of the housing and it will release whatever blade is on it, while it's down, add whichever new one you want and voila! Easy peasy!

Then it's time for the Basic Perforation Blade! The Cricut Maker is so smart and tells you what blade you should be using and even checks to make sure you have the right one in there!

One last swap to the wavy blade and you'll be all done! Time to remove your next mat! (Pro tip: remove the mat from the paper instead of the paper from the mat to avoid curling.)

As I perviously mentioned, my Design Space file can be cut to make an advent up to 24 days. Mine for this project will only be 12.
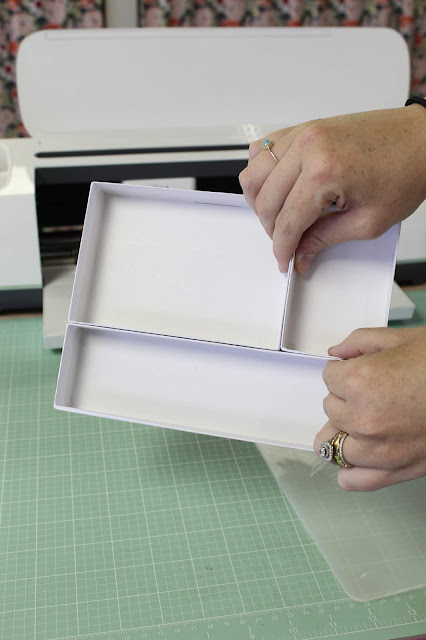
Now it's time to prepare the boxes! These boxes come three for a dollar at the Dollar Tree and are perfect for this project! Start by laying the boxes in the same format as they are in the design space file (long box on the left, medium box on the top right, and small box on the bottom right). Using your hot glue gun, glue them all together, being sure they are placed the same as the file.


Repeat as many times as you'd like (again, I did 12, but you can do as many as 24!).

And now for the fun part! Time to start really assembling!

This is also when you want to fill your boxes with goodies! (After this will be too late and you'll be opening empty boxes so don't forget!)

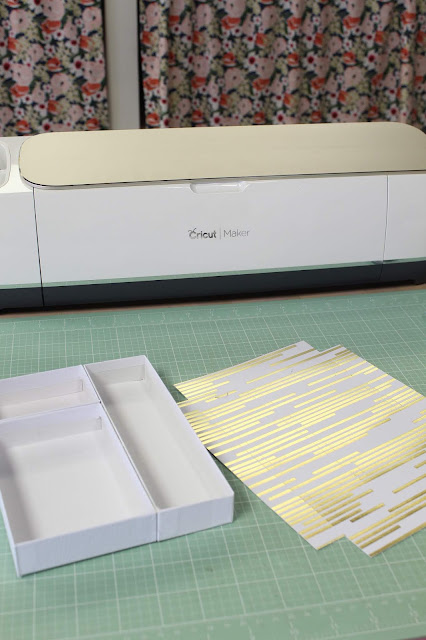
Fold on the scored lines. Because the perforated lines are SO good, you're going to naturally want to fold on those, but don't! Be careful as you fold and only fold on the scored lines.

I love using the XL Scraper tool to get a crisp fold.

Lay the folded piece on your box, it should fit like a glove! (I did some serious math-ing for this project so I hope ya'll appreciate it haha.)

Using your tape runner (this one is my all time fave) attach the paper to your boxes, again being mindful of where the perforation lines are and what boxes are where so they all line up.


Perfect!

Repeat as many times as you'd like! (I went with 4, which gave me 12 total.) I liked the look of four different patterns for my paper but that's totally up to you! You can do all of them the same if you prefer!

Now it's time to assemble the numbers.

Use your tape runner to attach the numbers to the circles. I just had to test out the new Wavy Blade for this project, and I decided to use it on the patterned circles. How 'bout those wavy lines! So cool right?

Then use your tape runner once more to adhere the numbers to each perforated box. Feel free to place them wherever your heart desires, the order is totally up to you!

Once you're done, hot glue all of your boxes together and you're done!


Check out those perforation lines.. and the wavy lines!

The perforation lines make opening each box a breeze! I can't wait to dream up some more projects I can do with all the new blades!


I can't wait to see what's next from Cricut but until then, I can't wait to keep playing with all of these new tools!


No comments:
Post a Comment