
It's finally time for another DIY!
And it's a Cricut DIY so I'm of course super excited to get to share it with you!
And it's a Cricut DIY so I'm of course super excited to get to share it with you!
My bestie recently had her second baby and she decided to move her oldest out of the nursery and into her "big girl room". I've been enjoying helping her with little projects to make the room her own. From helping hang the vinyl wall decals, to creating some custom embroidery hoops of their dogs. (You can see the whole room tour here.) She recently asked me if I could help with one more project and I of course said yes! She wanted a custom hanging wall banner that said "Big Sister". I had never made anything like that before but I was up for the challenge!

It ended up turning out super cute! It was such a fun and simple DIY, I decided to share it with you all too so you can make you own! My version does require some sewing but, it can easily be done with a no sew tape or fabric glue.
This post contains affiliate links, which means, if you click on one of the product links and make a purchase, I’ll receive a percentage of the sale as compensation. The good news? It doesn’t cost you any extra!
All opinions are my own.
All opinions are my own.
Supplies:
1/2 Yard Fabric of choice (A fat quarter is ideal if your fabric store cuts them.)
(I chose this adorable flamingo pattern)
Sewing Machine (or no sew tape/fabric glue if you'd prefer not to sew)
Thread (I went with white to keep it simple, but a fun contrasting color would be cute too)
Scissors and/or Rotary Cutter
Iron
Ruler
Wooden Dowel
Bakers Twine (you could also use ribbon or yarn, its totally up to you)
Cricut Explore Air 2
Iron on Vinyl ( I used black glitter)
Pressing Cloth
Cricut Cutting Mat
Weeding Tool
Cricut BrightPad (optional)
The beauty of this project is that you can really make this banner any size you'd like! The banner itself just needs to be able to fit onto your dowel. They sell packs of wooden dowels cut to about 12 inches at your local craft store. They also sell single dowels that go up to 36 inches so you really can make them any size. As for your fabric, it's a pretty good rule of thumb, once you decide on a size, to add about an inch to all four sides to allow for your seam allowance, as well as the channel at the top for the dowel. For my banner, I wanted the final product to be about 10 x 12, so I cut a 12 x 14 piece of fabric. Using a rotary cutter and a ruler (or scissors) cut your fabric to size.

To cut the "tail", the easiest way to do this, is by folding the fabric in half right sides together, and cutting in an upward diagonal from the fold out. Based on the size of my banner, I went to about the 4 inch mark. See photo.

Then you are going to fold over and press all of the edges except for the top. For a more finished look, I like to fold over each edge twice. Here is a photo of both once and twice so you can see the difference. It's totally up to you though. Remember... you'll want to leave the top portion unpressed for now.


Sew, glue or no sew tape all pressed sides.

Grab your dowel and place it on the top of your banner. Fold over the top edge to see how much space you need to be sure it fits in the channel. Remove the dowel and sew closed. We're almost done!

Now for the fun part! Using Cricut's Design Space, and some fun free fonts, I created this design using lyrics from a Kasey Musgraves song, but you could design anything you'd like! Just make sure your design fits onto your banner.

Using your Cricut Explore Air 2, cut out your design. Since you are cutting iron on, don't forget to mirror it, and cut it with the shiny side down.

Once your machine is done cutting, weed your design. I used my brand new BrightPad for this! It made weeding so much easier!

Once you're done weeding, follow the manufacturer's instructions to iron your design onto your banner, using a pressing cloth.

And voila! A totally custom hanging wall banner!


I just love the way the black glitter iron on looks!

And because you can use any fabric and any iron on vinyl, with any design you want, the possibilities really are endless!
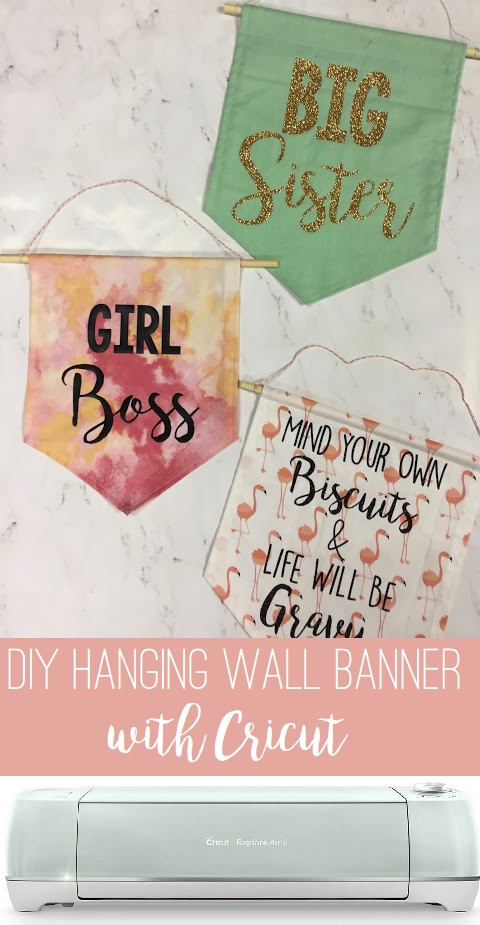
And check out this awesome watercolor version that I found in Cricut Design Space!

Get the Goods
Use these affiliate links to get everything you need for this project!
If you try out this project, I'd love to see it!
If you post it to social, be sure to tag @notsoclishea and use #notsoclishea!

This is a sponsored conversation written by me on behalf of Cricut. The opinions and text are all mine.
2 comments:
What cursive font did you use?
It's bromello from dafont.com :)
-Shea
Post a Comment